
Wednesday, 27 April 2016
Tuesday, 26 April 2016
Colo Colo: Better Running Animation
With the deadline looming I feel I am almost ready to have something presentable. Most of today was spent improving my run cycle animation which thanks to tips from Alan and Julia looks much better than it was. So far I quite enjoy what I have turned out, This feels like a huge step up from my previous projects, and so far I feel confident I can produce something effective by the presentation day on Thursday.
I don't plan on showing much animation, but I can easily make up for it with turntables and an effective presentation I am sure. As along with the running animation above, I have also planned for an idle turntable and below the footage includes a few seconds of it demonstrating what it does when under threat or acting aggressive.
Monday, 25 April 2016
Colo Colo: First Animations
I was unable to update my progress on the weekend but after essentially re-skinning the model I feel confident I am at a state I can animate. So what I attempted this afternoon was an animation for Colo Colo running to start me off. Errors in the model have come up, and I feel I may have made the thighs too wide but progress is progress. Over the next couple of days I hope to build a set of action animations to give the creature some personality. The time spent correcting my mistakes has however eaten into time that could have been spent with other preparations.
I am not dissatisfied however, as this entire project has been ambitious compared to what I have done previously, and I am not disappointed as I have always enjoyed the concept of a challenge. What I have produced so far I do not feel came out badly.
Enough confessions, I also prepared a playblast. The difference between this and the rendered version is mainly from improving from what I had discovered using this initial animation sequence.
Thursday, 21 April 2016
Colo Colo: Correcting Anomolies

Along with making the eye, much of this afternoon was sepnt correcting my shader networks. As it turns out, my decision ot lay all UVs one on top of the other was indeed a massive blunder. After some suggestion, including moving the UVs and working with layered texture nodes, asa result things are much cleaner. Instead, the UVs are laid out onto two grids, paired together using a layered texture node. One of the UVs - in this case the UVs for the head and feet - were moved to the side. The UV maps were set to not tile, witth the head-and-feet UV set moved to the side with a UV offset parameter.


The eye has so far fit well. There's a slight geometry concern with the cornea but it does not show up on the model unless the camera is really close or the light shining on the eye is very intense. While the cornea does dull the eye itself slightly, It is still useful for that reflective spot that can give an eye life. I am considering intensifying the colours for the eye itself to make it stand out a little more, a simple matter of increasing the colour saturation. I also migth look into the technique used for the x-ray shader to give the cornea some presence but there's not much priority for this as the likelihood of seeing the cornea's form away from the iris is very rare.

One minor issue that is coming up a little bit is with one of the mila shaders. Although unlike the last few times, this one is perhaps ignorable: Above is what happens when I try and tie two texture nodes together using the scatter and diffuse reflection nodes, setting the texture into the colour nodes. While it adds soem brightness, it messes with the lighting and shading. The rest of the body in the above picture is working with a flat colour for the diffuse reflection but I don't think it matters as the normal maps work fine with a flat colour parameter for the diffuse reflection. I could in theory go into the diffuse maps and brighten up or add some saturation to the skin to compensate for the desaturation that is occuring. But it is of no major issue.

This is the diffuse map for the eye, based on images of eyes from varying types of small lizard and a few chickens. I am considering yellowing the sclera that makes up around 3/4 of the map. There was some consideration if the pupil would be slitted or circular. But i nthe end I decided on a circular pupil, as it would dit more closely to the rooster motif than a slitted pupil, which while beneficial for an unnatural feel, the creature is intended to be a mix of endearing and unnerving; looking cute to an extent, but hiding some really horrid qualities. A circular pupil, I concluded, was the better option for this effect.
Wednesday, 20 April 2016
Colo Colo: Diffuse and Normals Done

Much of today's priority was finishing the textures. And at this stage I believe the only thing left is a specular map. When I completed the textures I imported the model into Mudbox, using the clone tool to clean up the seams between the various parts of the core body. While I think this has certainly helped the quality of the model, I ended up hitting a stumbling block with painting the textures in Mudbox as I was using two textures on a single body. I compromised by tiling a sample of the skin from aroudn the feet and transferred it to the body UV where I copied it, blended the copies using the clone tool and then used an eraser to blend the layer to the base of the legs.


In the right light, the normal maps really define the roughness of the skin. The addition of specular maps may be what is needed to make the skin definition pop out and give it some moisture.

There's still an issue with the line running down the leg. But cleaning up the model I think cut it down slightly, I attempted a clean projection on an alternate file to find that this version (planar projection, cut at the same point as on the main model) looped its edges around as well. Fortunately it seems ot be just the edge, if I move the cut-line down the model, the seam moves.

I didn't get to shape him in Mudbox like I initially aspired to but I'm not disappointed. The texturing works out fairly decently and given the inspirations were cats and rats, whose skin tends to be loose enough to hide a lot of the muscle definition. I added some definition where it might be seen though.

I feel certain a specular shader would really make the tongue pop. Something is needed to give it some nice, slimy gloss to sell it as an organic object, same goes for the skin itself. I'm sure with the right diffuse map I can make the tongue glossier than the body. The completion of the texture maps done however (aside from the eye but this is simple compared to the other skins) means I can put priority on the specular maps. Which might not take too long given the current state of the texture and normal maps.


Tuesday, 19 April 2016
Colo Colo: Head, Feet and Chest

Progress is developing nicely with Colo Colo, progress with the texture maps are coming along. For the most part I think the body is in a state I can consider it finished.

The one issue so far is that there is a problem with the thigh's UV. One line down the very front of each thigh for the rear leg seems to be getting errors. When smoothed, this one line wraps around itself, creating an artifact in the form of a highly compressed duplicate of the rear leg's texture that fits between this vertical line of UVs and one set of UVs on its of the UV map, effectively projecting the rear leg's UV down one line of faces. This error however, does not show up in the projection in the viewport but that can be down to a lower-quality projection.


One thing I have definitely concluded working on this is that at some point I'll need to go into Mudbox to fix the seams between the projections. I had attempted to mimic the colour of the legs between the two projections, but due to the way I had shaded the leg in the body texture map, the translation wasn't perfect. The above render is the closest I might be able to get for now.

Errors aside, I have made a lot of progress on the head for Colo Colo. Texturing as something to resemble the concept art I had made, I think I'm fairly close. The other major thing I added was a mechanism to mimic the effect of the creature's heart beating or lungs cycling (chest motion essentially). At present it may be slightly too rapid, but I can control the rate as the chest expansion is tied to a driven key and an attribute in the shoulder control. The testing speed is based on how small creatures tend to have very fast heart-rates, as well as looking at some footage of lizards and myself in a mirror to get an idea of how extreme the inhalation and exhalation is during the breathing cycle.

The beauty of controlling the rate like this is that with only a couple of tweaks, the breathing rate can be refined, or this rate is for when it exerts itself. Though changes in rate might involve either swapping out for a fresh duplicate with the differing or transitional rate, or input each cycle by copying and pasting.
Or a MEL script.
Friday, 15 April 2016
Colo Colo: Rigging the face
With a partially done texture in place, priority today was on installing the final controls which were for the eyes and eyebrows. This was achieved by keying the transformations to blendshapes set separate from the main model, the transformations on these blend shapes would be reflected on the main model. The main downside to this measure is there are three instances of Colo Colo in the scene, but these can be hidden both in the workspace and in the outliner.

The eyelidss were a bit of trial and error to get the angle right, as they're not human eyes. One of the alleviations I found during testing was angling the eyes so they twisted slightly as they closed. Not what normally happens but it allowed me to somewhat preserve the positions of the corner joints. I also made the discovery that I might have added too few polygons and so there is quite a bit of stretching on the upper eyelid in particular, but this can be rectified by a tweak to the UV.


The sub-surface scattering is so far coming out reasonably well, even on the current skin. This can especially be seen i nthe light-obscured areas of the body such as the right-hand thigh. The priority now is goin to be textures, so I can make Colo Colo look really nice


When rendered out, I think the texture comes out fairly well. There's some artifacts but these can be fixed by some minor modification of the texture map inside Mubox.
Thursday, 14 April 2016
Colo Colo: Texturing Begins

I decided to take a break from skinning today and work on the creature's textures. Originally going for a kind of skin, the outcome of the current texture has made me rethink the approach.I may add a few scales to it, perhaps on the back or thighs to give it a little visual diversity.

I included the above image as one thing that is cropping up is the display of muscle, and I felt this small section was one of the best outcomes, as it looked like definition and not a seam or a cut. So what I have tried (still working on it) is replicating this effect elsewhere on the model, although that is proving easier said than done.
The texture is made up of several layers. The first is a pair of photographs of skin found online (I kept a record on a notepad document, but their licenses allowed for use and modification), combined them, tiled them then applied them underneath the UV map. The high-contrast outcome is what is making me rethink of doing only skin, as there are a few mottled patches that resemble perhaps crocodile skin, and that could reintroduce some of the reptilian quantity I was going for.

To preserve the skin texture underneath, I made layers for the shadows, highlights, and the red tinting. Once these textures are complete, (the torso segment looks asymmetrical because I plan to mirror the highlights and shadows later) I will use these for the creation of normal and specular maps to give the proper 3D texture skin.
I'm getting a feel of H.R. Giger from these textures.Particularly the torso and the rear leg.
Wednesday, 13 April 2016
Colo Colo: Skinning Progress 90% Done.

I'm nearing a state where I think I can consider rigging done. There are some cases where some supplementary geometry might help to add definition, as around the elbow, perhaps some of the torso (below) there is a fair amount of collapsing going on. However after optimising the scene size, some geometry defects have returned, something I will have to look into correcting.
 |
| There are a couple of kinks. I might need to revise the IKs on the left front foot. |
I have to keep an eye on time, so perhaps the best solution, after making these corrections, is to move on to the texturing, so I have something that looks complete on crit day 2 weeks from now. As time marches on I suppose I will ahve ot settle for some demonstrative animation over a proper narrative, although that might have been something hinted at during the pitch.

For them ost part I am happy with what I have so far. For the most part the model works, the rig is working, the number of controls for the tongue and tail I could slim down as these are on IKs and the flow of the model is there.

Worrying about the curvature of the spine has gone away somewhat now that I have a core control-base control pairing that allows me to move the model's body while the feet remain planted firmly on the ground. I'm considering if it might be worth adding a spline IK into the spine to keep that fluidity.

As I said when I optimised the scene size, a few of my painted weights were shifted, a task that hopefully won't take too long as it is merely housekeeping. But while the optimisation did being up this issue, it made up for it a lot by streamlining the workspace - Before the optimisation things were slowing down, but after the optimisation and a clearing of the deformer history, things moved much faster on my PC, which eased up setting parameters considerably.
Tuesday, 12 April 2016
Film Review: When The Wind Blows
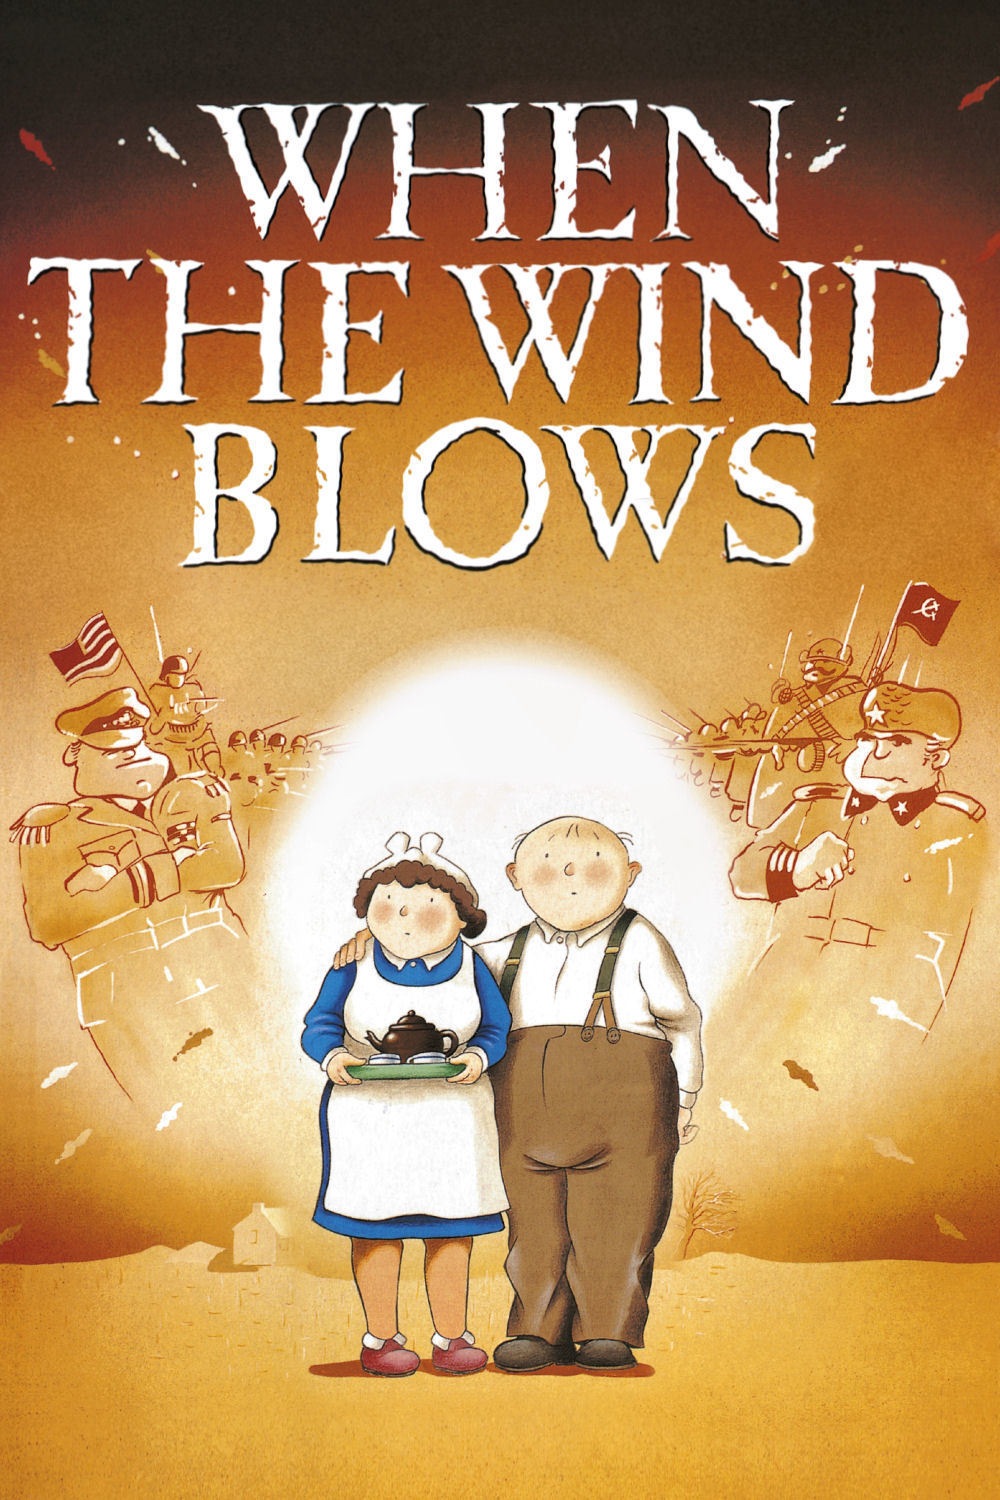 |
| Figure 1: Theatrical Poster (Covey, 2015) |
- Director: Jimmy Murakami
- Native Title: When The Wind Blows
- Primary Language: English
- Format: Colour
- Year of Release: 1986
- Budget: Unknown
- Film Length: 80 minutes
- Production Company: Meltdown Productions, British Screen Productions, Film Four International
Named after the David Bowie track presented at the start, When the Wind Blows is an animated British production set at the height of the Thatcher/Reagan era of the Cold War, the film examines the paranoia of Mutually Assured Destruction and became famous for displaying the rather disastrous effects of nuclear fallout on the human body. And looks at how well-prepared the British public truly was for an actual nuclear attack, interspersed with recollections of life during the Second World War.
For American cinema, 1986 was the age of the macho one-man army, the post-apocalyptic survivor and the plucky agent averting World War III. But what makes Where The Wind Blows stand out is it takes an alternative view of this genre. "Possibly most important is the screenplay by Raymond Briggs, who adapted
his own novel and who has a wonderfully comic way of turning a cliche
inside out." (Canby, 1988). Instead of communists and a small armoury, we see a quaint middle-class couple as they come to terms with how a single bomb has turned the Sussex contryside into a scene from Fallout or Mad Max. But worse, much of the film watches them as they progressively become sicker and sicker from an illness they don't even realise they have.
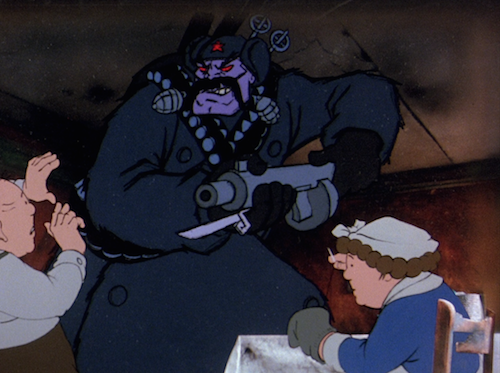
There is a degree of quintessential British charm underlying the film, a sense of "Keep calm and carry on" that the two protagonists James/Jim (John Mills) and Hilda Bloggs (Peggy Ashcroft) maintain, and to the film's credit. "Though the subject matter of this film is dark, there is a fair amount of low-key comedic moments in the dialogue." (Burbank, 2015) The two discuss what James would wear when the bomb drops, while Hilda's first priority after emerging from the shelter is to clean up. And when the two discuss what should happen should a big scary Russian soldier burst though the door (complete with a visualisation of a hairy red-eyed giant doing just that), Hilda's reasoning is to offer the invader a cup of tea because she heard Russians like tea.
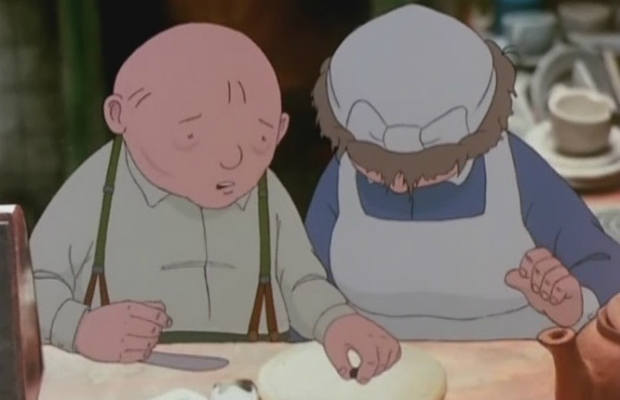
 |
| Figure 2: How the film tackles nuclear war: Two middle-class retirees slowly dying of rad poisoning. (Roberts, 2011) |
 |
| Figure 3: Imagine spots like this are scattered throughout the film, often in discussions on what their lives in WW2 were like. (Remer, 2014) |
 |
| Figure 4: Jim's theories for Hilda's deteriorating condition hilight how little he knows of what's going on. (Smith, 2014) |
References
- Canby, V., 1988; Review/Film; Animated Black Comedy About Courage as the World Ends; The New York Times; available at http://www.nytimes.com/movie/review?res=940DEFDC103FF932A25750C0A96E948260 (last accessed 8th April 2016)
- Burbank, M., 2015; Vintage Film Review: When the Wind Blows (1986) – A Nuclear War Tale from a Different Perspective; The SIlver Petticoat Review; available at http://www.silverpetticoatreview.com/2015/08/23/vintage-film-review-when-the-wind-blows-1986-a-nuclear-war-tale-from-a-different-perspective/ (last accessed 8th April 2016)
- Patrick, T.; Review: When the Wind Blows (1986); That Film Guy; available at http://www.thatfilmguy.net/when-the-wind-blows-1988/ (last accessed 8th March 2016)
Image References
- Figure 1: Covey, R., 2015; [Theatrical Poster]; When The Wind Blows Poster; available at http://www.chud.com/wp-content/uploads/2015/11/When-the-Wind-Blows-Poster.jpg (last accessed 12th April 2016)
- Figure 2:Roberts, S., 2011; [How the film tackles nuclear war: Two middle-class retirees slowly dying of rad poisoning.]; When The Wind Blows Header; available at https://stevenrobertsdmublog.files.wordpress.com/2011/11/when-the-wind-blows-header.jpg (last accessed 12th April 2016)
Figure 3: Remer, J., 2014; [Imagine spots like this are scattered throughout the film, often in discussions on what their lives in WW2 were like]; 1417529820_3; available at http://www.dvdtalk.com/reviews/images/reviews/290/full/1417529820_3.png (last accessed 12th April 2016) - Figure 4: Smith, J., 2014; [Jim's theories for Hilda's deteriorating condition hilight how little he knows of what's going on.]; When The Wind Blows; http://www.ioncinema.com/wp-content/uploads/2014/12/when-the-wind-blows.jpg (last accessed 12th April 2016)
Monday, 11 April 2016
Colo Colo: Weight Correction

With the rig mostly sorted, I decided now was the time to begin skinning. As this is a somewhat complex model, particularly for the head and torso, this could take some time. Some areas however, like the neck are not too bad, but some areas the skinning assignment was just weird. So that is my task for this week.

I used a combination of painting and editing weights to separate sections, this was particularly the case in the mouth where the jaws were initially fused to the head.

Understanding the flow of the shoulder muscles is on my current to-do list. This current image is slightly sloppy but as seen below I'm working to improve it vertex by vertex. Though come to think of it, right now it sort of looks like the poor thing's dislodged its shoulder.


Friday, 8 April 2016
Colo Colo: Streamlining the Control setup

Today's been very busy setting up a working rig for Colo Colo and after spending some time I think he's almost ready for skinning. All that is left to set up is the tail and I need to re-rig controls for the neck I also need to set up controls for set up controls for the rear toes and for the mandibles, the last one was previously the domain of another control that I had deleted in order to streamline the control scheme.

Much of this improvement comes from advice from Alan to look at some quadruped rigging tutorials, which did indeed help immensely not just for the legs but also for the neck. The tail will follow a very similar control method to the tongue to make control of it smoother than controls for each point on the tail.

I reacquainted myself with pole vectors and IKs in particular, and I feel certain the tweaks have improved things a lot since yesterday. I believe I will be at a stage when I can skin by the beginning of next week, it all feels very promising.

Using driven keys I was able to fully rig up the quills, which have been programmed to sway from side ot side, bend up and down, and fan out and up, which when combined offers a lot of versatility for using the quills as a form of expression. Though maybe I should consider adding negative values for the spread parameters to allow the quills to fold inwards.
One of the key ideas for expression is that when Colo Colo feels threatened, it hisses and shakes those quills to make itself appear larger and more dangerous.

Thursday, 7 April 2016
Colo Colo: Bones and Joints

Alongside working on tutorial workshops I did a lot of rigging work today. To minimuse the number of moments of glitching geometry I decided to rig the model first before skinning it, save for the tongue which was rigged and skinned as it was relatively basic.

This isn't the final state however. I would look to consider locators or perhaps universal manipulators to help when positioning the limbs. The largest hurdle to this has so far been the use of digitigrade feet, which adds an extra section to the limb

As well as the tongue I also connected up the eyes. However I might upgrade this to using a locator rather than being tied to the XYZ rotation of a NURBS circle as shown above. As this would grant a little more freedom for positioning the eyes, and perhaps streamlining the animation workload. The alternative is to preposition the pivot of the NURBS circle so that it orbits around the eye. It's been a year since I modeled eyes in the Maya workshops but I do recall the use of locators.

Each of these vertebrae controls are linked to the vertebrae by controlling the pivot angle and are parented to the control node down the chain which leads from the head or the toes to the hip, where the creature's core is..


Subscribe to:
Posts (Atom)