Showing posts with label practice. Show all posts

Tuesday, 29 May 2018

Back to Basics with Digital Drawing


  I've been going back to basics lately with my drawing skills. I've had a nagging feeling for honestly quite a while that my colour depth palette has been rather muddy. I've noticed I get lost in getting the shade just right at the expense of how clear the composition is. So, back to basics; getting familiar with the essentials of blocking colour first before moving on to tackling light and shadow.

  After all, many projects are 20% crunch, 80% cruft. You want to get that 20% foundation right or the whole thing just doesn't work.


  This new approach I feel has also given me a chance to back away from relying on dark lines to delineate shape. The pictures I have been drawing lately have been moderately popular on Reddit which is good for exposure. I'm getting plenty of feedback and starting plenty of conversations about what I've been working on. It could be some time before I'm back to full-shade digital painting like I've been doing before: I'm taking this one step at a time, so when I am ready to start adding shade again I am definitely ready.


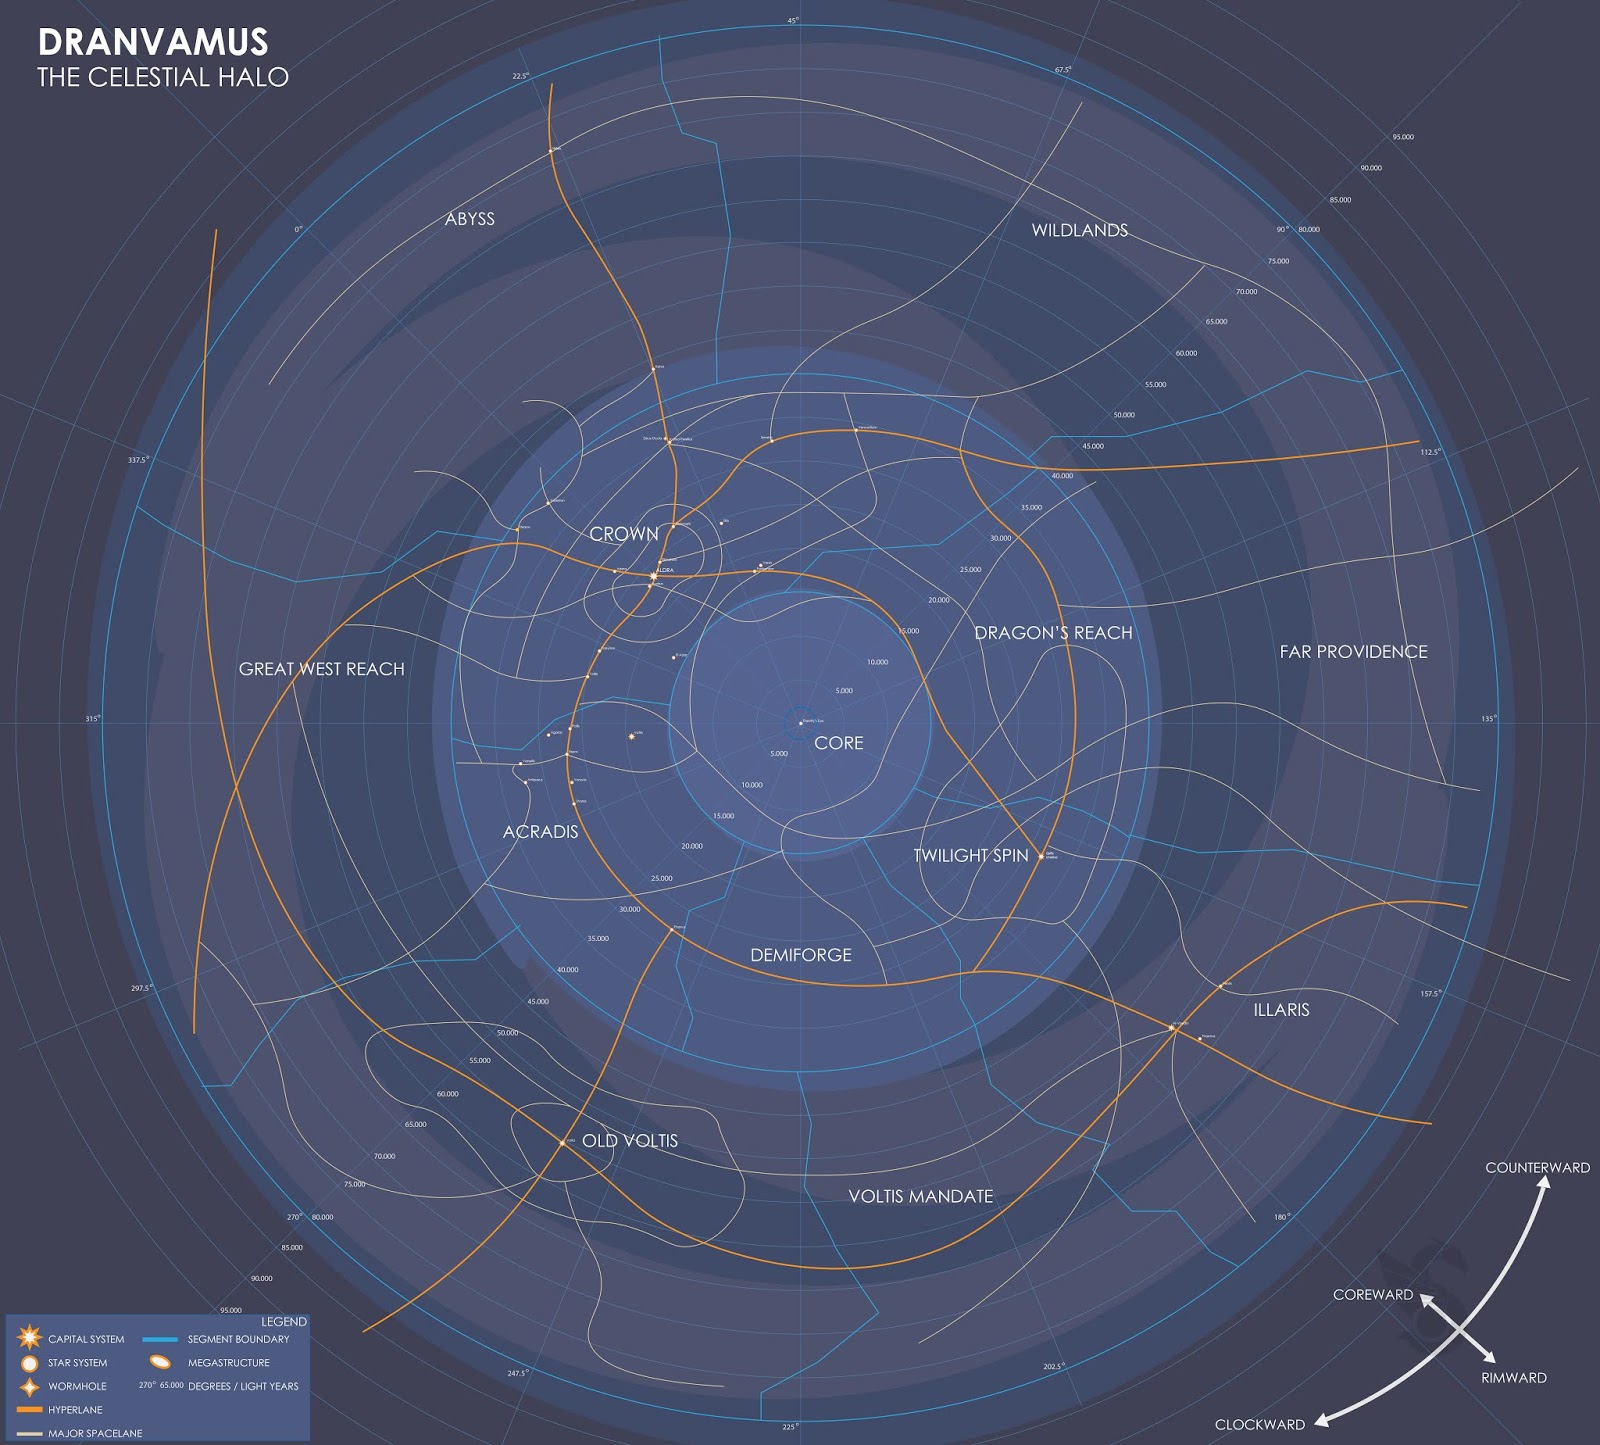
  Moving away from the same old character subject, I've experimented with map design using Adobe Illustrator. I've found it and PDFs amazing for condensing enormous images into something I can easily send to clients. When I tried buildign something like this on Photoshop, it would slow my computer down as the images, plus layers, might be over a gigabyte in size. Which my computer did not like.

  But it was mostly fun to try map-making, which I have found to be an amazing way to build a setting as they say you can tell a lot about a place by reading into how the local inhabitants drew their maps.


Tuesday, 1 May 2018

First Week with Zbrush


  The past week or so I've been experimenting with Zbrush. It's quite advanced compared to Mudbox and I can see why a lot of studios are asking for experience with it. It's versatile, complex, and I've found I can get an outline of something after about half a day of working.


  So for now I've mostly been trying to see what I can make out of a single ball. As I had hoped, my experience with Mudbox translated well. I've yet to try texturing, that's going to be something of a later stage experiment.


  Considering how long it has been since I last touched sculpting software I was slightly surprised at how well I was able to create a face I've had people describe as handsome and good-looking, That's likely a very good thing when this is my first attempt at human features and started out with a generic template head. The drawing classes  msut have contributed considerably to that.


  Overall, I've enjoyed the product so far. Really glad I invested in it. I've already been asked by friends if I could sculpt their own characters with this, which means I'm either appealing to eager friends or I might have a creative skillset I can really sell.

Saturday, 20 January 2018

Dwarf Fort - Geometry Cleanup


  Things have been quiet on the front of the fortress as I have mostly been polishing model UVs ready for textures. Although I have made significant progress, I must have done something I probably shouldn't as Maya has gotten into the habit of crashing. This was fixed with a driver update for my graphics card and so far it all looks good, more progress can be made now things are more stable.


  Although the plan is for a uniform arrangement, the inclusion of the ramp means that in order for the rest of the decoration to fit, the structure needs to flow, so the skirting will likely follow the ramp. Redoing the wall als ogave me a chance to even up the geometry of the walls and floor.


   For the ceiling of this room, I'm thinking of building it so the ramp is ceilingless, the ceiling will connect to the rest of the structure by the columns which support the ramp..

Wednesday, 19 July 2017

Building Planets


Today I had some fun with some rather literal worldbuilding. Using the free visualisation Space Engine offers an immense variety and some very powerful procedural generation software. Seeing the rendering power of this engine I decided to experiment with Maya, taking some of its possibilities further, as although effective with natural phenomena, I wondered about using it as a springboard for some science fiction models.

After extracting the procedural generation of a particular planet into bump and diffuse maps, I took them into Maya and built a model out of three spheres - the base planet, a cloud layer, and a faux atmosphere with a transparency determined by its facing ratio to the camera.


Space Engine tended to crash when exporting a Mercator projection larger than 4096 x 2048 pixels, but offered a box projection option as an alternative where it would export a file into six smaller images. A box projection allowed for the construction of a more high-definition model and could be useful for close-up shots.

The world I used was rather dead, so using Mudbox I painted on bands of colour that would mimic foliage.


The night map - intended to show signs of civiliseation - was the most bespoke part of the project,.as Space Engine has no way of building this on its own. It had to be created from scratch and was used as an illumination map.


The techniques used to build the shaders and the textures could - with further practice - be built more from scratch, allowing for more custom-designed planets that can be built in the span of an afternoon.

Sunday, 21 August 2016

Artstream 20/08/2016: Minotaur


  Over August I felt I needed to do a little brushing-up on my painting skills. As painting is a skill one has to practice to maintain, not just to develop, I keep feeling like I'm not painting enough. This Minotaur was a half-finished development from a previous streaming session that I ended the stream on half-finished. So my decision was to go back and see if I could finish it, or at least improve it. The current result I'd rate as decent, I think I am getting a better handle on of light patterns, brushes and adding a creature into the background. I still have a ways to go but it's an improvement; with every picture it feels like I am getting a better grasp of digital painting.


Thursday, 5 May 2016

Sculpting Worshop: Head Progress


  I had not posted it while in progress aside from orthographs of the head, but Garrus has come along fairly well during the sculpting workshop. The only drawback I think is I made the head slightly too large, as it ended up using a lot of clay to get a finished result.


  I have considerations for finishing him over the summer, I have more clay on the way and aside from detailing and a bit of smoothing, what remains are his eyepiece and the three horns that rise from the top of his head. I plan ot stick ot slow cooking him, only 115 degrees in the oven, trying not to think too hard on the worst-case-scenario of him exploding but a low heat might help offset that risk. If he does, at least I still have a record here.


He's come out fairly close to the source design, the lower face might be slightly longer than its supposed to be as he has a very deep head. But I have sculpting tools to rectify that as it likely jsut means raising the mouth-line..


Wednesday, 27 May 2015

Personal: Design Practice

More practice drawing and brainstorming with design ideas. I think I prefer the secondone for its less conventional features. I also wanted to have a go at drawing distant buildings, landscapes and sky, as well as practicing with a few brushes such as pointed ends, but clouds in particular as I have returned to working on Infiltrate Exploit Spread. I want the clouds for the first scenes to look their best so I used these concepts to sneak a little cloud-painting practice in.

1

2

Monday, 2 March 2015

Life Drawing Studies


    This morning's Photoshop studies were interestingly not in Photoshop, as we spent the lesson performing different life-drawing techniques. Most of the sketches are labelled with the associated technique that I practiced with. Drawing no. 2, drawn with my left hand instead of my right, looks as though the flowers have wilted and no. 7 (drawn by focusing on the detail of the woven stickball seen in no. 15 and not looking at my sketchbook) appears somewhat cosmic or unreal.

Saturday, 15 November 2014

Project 2 Development: The Mountain

    At present I am at something of a design crossroads in regards to the background. Here I have attempted to alleviate this by coming up with several variations of the overall elevation and tint of the the mountain behind the city and created the following contact sheet in an attempt to work out which combination may work best. Above the dividing line are different tint experiments and below the dividing line are various tests with the height of the mountain. Personally I am more inclined towards combining thumbnails 7/8 and 3 to get the right shape for the mountain
 
   Because the sun is rising up from behind the mountain I intend to add a golden highlight along the ridge that fades away the further the mountain line gets from the son location. The main reason I wanted to experiment with altitudes was because I was interested in the kind of skyline that could show within the cloud layer. To the right is another height test. This time trying to make the mountain a little more undulating and allowing for smaller buildings to appear taller as well as bringing them into the sky a little more.
 
   These changes may have a knock-on effect in terms of highlights due to the altitude of the sun in the image which I decided early on would be peeking between the cliffs of a distant valley.


Tuesday, 23 September 2014

Familiarising myself with Maya

Tonight was feeling a bit more productive than last night so, after getting Maya installed on my home computer I thought I'd have a go at using it and seeing how well I got on with it. So I browsed the CG artists' toolkit provided by Alan and decided to have a look at some of the tutorials. Since I was in a bit of a pickle in class on how to do anything but pull the shapes or make the bad kind of random mind-expanding geometry I decided to look up the tutorials to see if I could get better.
By the end of my first Maya session this was probably the best I could do...


Originally a rundown on the difference between NURBS, polygons and subcompoonents, I decided to follow the step-by-step guide of how to make a cup with a polygon.

So the simplest of acts aside from creating a basic shape was using the "insert edge loop" tool. That combined with double-clicking on lines to create the framework did feel somewhat therapeutic.

 Next step was transformations and scaling, which sometimes got a little fiddly. But I pushed on and worked out what to do.
 
Shape is coming along nicely for my first ever proper Maya model. I think I was getting the hang of it by this point.

...Then I went back into perspective mode. I felt like I had screwed up and didn't know somewhere along the line. After a bit of tweaking I realised I must have mis-moved a few transformations so somehow the neck ended up stretched really far. Still, it was only on one axis that it happened so I figured I could fix it. Double-click the furthest edge ring and drag it back. Once in line with the next ring I shift double-click to select the rings and pull them too.
Then I realised the neck had only been shaped from one side, so the front and back were fine but the sides were still essentially tube-like save for a concave bit in the middle. So I came up with a plan: I would copy the model, rotate it 90 degrees then go back into orthographic view and use the duplicate as a template to move the wireframe nodes to the right position, and as can be seen by the cup forward and right, it worked! I had a circular cup with ap roper neck. I found out later the best way to get a result and nto get that was to scale from the box in the centre and nto the arrows, which guarantees an equally-scaled shape.
This was the part I had messed up in class. Simon had showed the class then showed me again the trick to smoother and less doughy edges and I had one of those moments where I understood it...then forgot it when I tried it myself. Now I realise the best method is to extrude fro mthe edge, which took a bit of working out how to do properly, but now I know how to do so: Click the top parameter of the model in the menu on the right, scroll down to "offset", click the word, hold the Control Key and push left or right with the middle-mouse-button held down to pull the extrusion space inwards.
After a few practices and one translation later I'm starting to get hole where the liquid or the egg would go. Then Once its at the right level, I click the "scale" button and drag it out slightly to match the angle of the outer edge, then repeat the extrude process. What I found interesting was after a couple of extrusions the drop was almost automatic, fairly lucky that the exterior faces were relatively equidistant, so I scaled then extruded again.
After repeating the extrusion process on the base, I have something that does look rather cup-like and I quite like what I have managed. It took a bit of time and analysis of the tutorial to get right but I think I am getting the hang of Maya.

FInal touch was giving mroe volume to the rim, made by using the "insert edge loop tool" and then translating up the Z axis to create a wedge around the rim. I didn't need the duplicate cup any more so to save clutter and file size I deleted it, even if this is only a relatively simple structure.
And I hit the Render key and et voilĂ ! One egg cup. Took me a couple of hours and a few repeats of certain moments in the tutorial but the basic shape of my first Maya model is complete.
 Now that I have tried using Maya for something proper rather than some basic geometric shapes I feel a lot more confident with it than when I started. And once I got into the tools it got more comfortable,  I was willing to keep going even if one or two points felt slightly tedious and some modelling moments I wasn't sure where I went wrong but in the end I am satisfied with my end result. I was also surprised that I managed to create quite a decent model from a single polygon shape. It feels like an entire world of opportunity has opened up for me, that first-accomplishment euphoria is certainly kicking in by now.