Showing posts with label UV Mapping. Show all posts

Thursday, 28 March 2019

Starting the Baths of Caracalla


  When I visited Rome a couple of years ago as part of a university trip, one of the places we visited was the Bathouse of Caracalla in the south end of the city. An enormous leisure complex commissioned by the Roman emperor Septimus Severus, finished by Caracalla and first opened in 216 AD, I became deeply inspired to maybe consider building this place in the digital space as a later project. I'm sort of kicking myself I didn't consider this as my choice of major project in my third year of university as it perfectly aligns with my interests: History, architecture, grand buildings and highly ornate architecture.


  Honestly spa complex is the best way of describing this site. As well as the various public bathrooms that these structures normally had where you'd move from a cold pool (frigidarium) to a medium-temperature pool (tepidarium) to a hot pool (caldarium), the bathhouse constructed by Caracalla had all kinds of leisure facilities. Gymnasia, libraries, gardens, saunae and even an amphitheatre are featured either within the building or on the surrounding grounds. The whole complex was walled off from the rest of the city in a great square dominated by decorated gardens, and while it looks like one would enter through the circular dome, the most likely entrance was closer to the gymnasia situated on the wings. I'd almost describe this building as the pinnacle of Roman pleasure-seeking. Like one of these resort hotels with the main difference being a lack of board for any attendants.

  It's not just massive by land area, it's also a structure that is enormously tall for the age. The columns I have made so far reach a height of some eight metres, but the baths themselves possessed columns (of Egyptian marble no less) could be as high as twelve! Add to this the columns would merely support a second floor or a high ceiling, so the building could be two or three times the height.


  The great dome of the caldarium, something of a downsized version of the dome of the Parthenon, would make the caldarium itself some four or five times the height of the columns that supported its  various entrances.

  For a classical building the scale was just staggering.

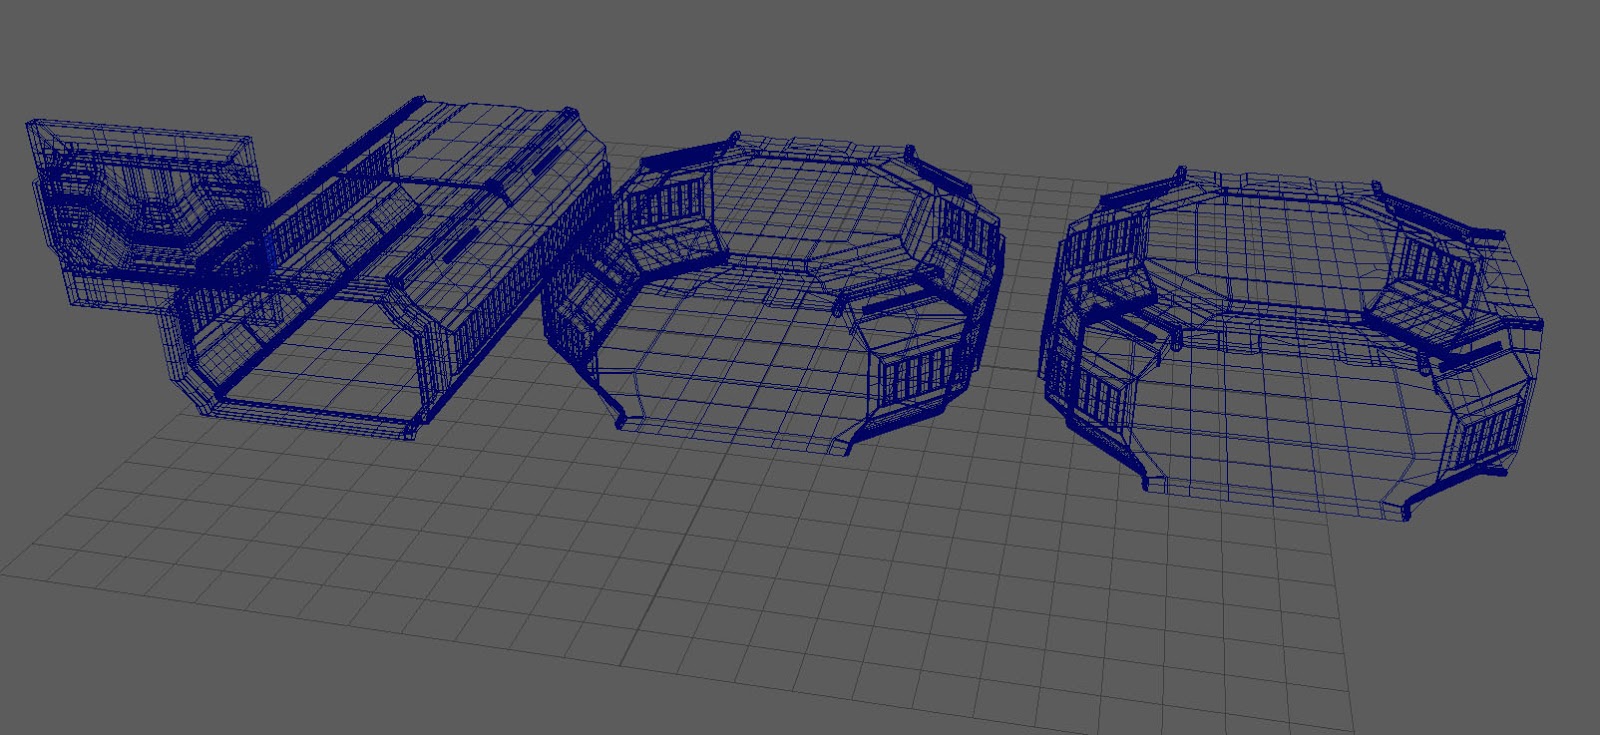
  As this is such a massive building it's already taken me a few days to build just the geometry for the caldarium. The positive of a construction project like this is I can likely use various elements for the building already elsewhere. Roman architecture was very fond of decorated columns and a uniform structure, as the Romans adopted the Greek idea that uniformity was an expression of divinity. So to get those done first feels like it should make the rest of the project a lot easier with a lot of possibility for recycling.


  My current plan is to break up the construction into several components. Key locations in the structure will class ans modules in and of themselves and I've been thinking of releasing elements like the columns and the archways to marketplaces like what ArtStation has unveiled not too long ago. I've already had at least one sale already.


  I'm currently debating wither to include a translucent geometry for filled pools of water. It is definitely a distinct possibility so as to give the feeling this was a living building. I am admittedly taking a bit of artistic license with the project in that designs for what the building could have looked like seem to vary wildly between artists from the first inspirations drawn up in the 19th century (which would have been inclined to include neoclassical features) to modern-day historical recreations. I'm a sucker for the artistry that comes from Romanticism even if I have my reservations about the ideas of the movement, so I may take the Romantic angle of the building mostly as an experiment in creative design.


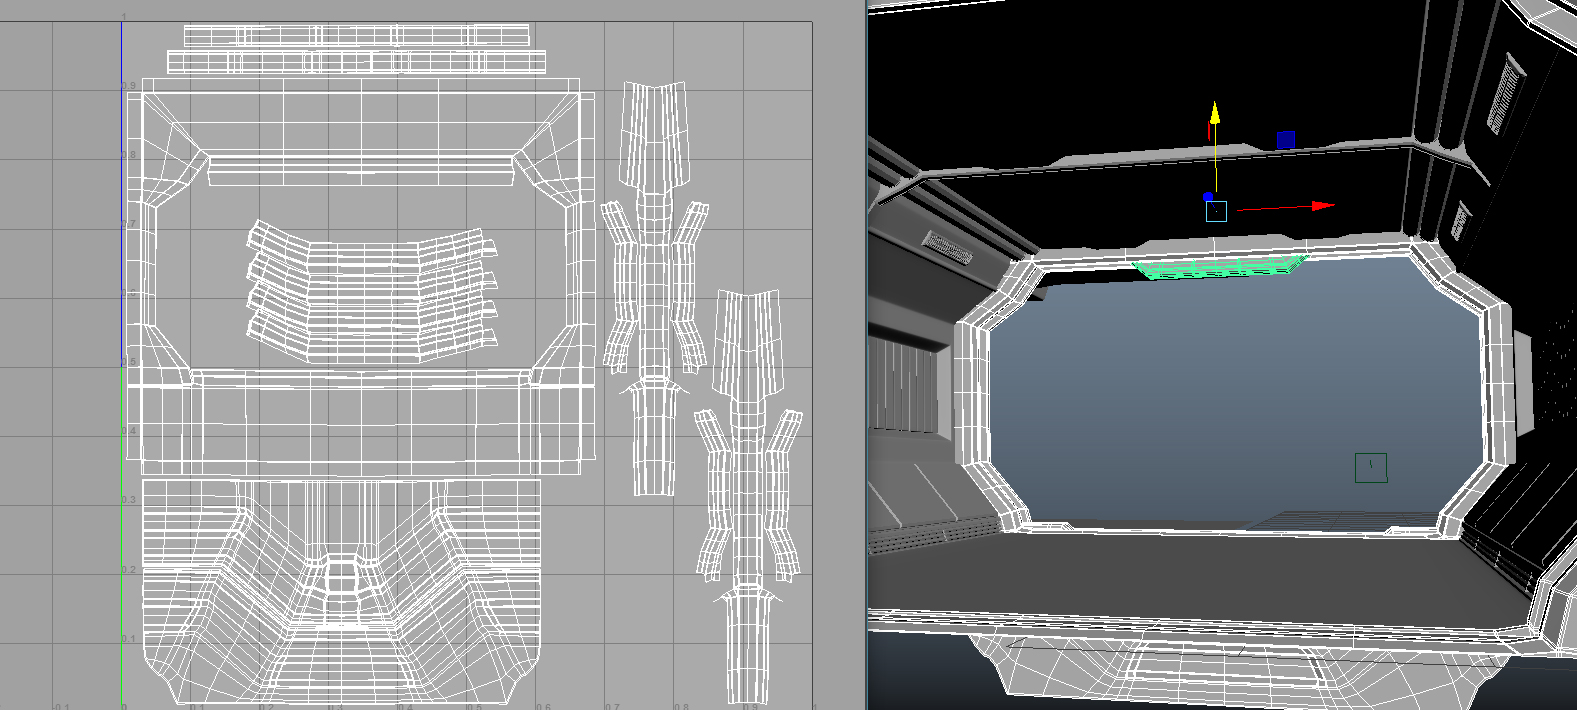
  I'm looking forward to pushing this project further. A good portion of the Caldarium's ground floor is finished, from there I plan to decorate the upper levels which would included the recessed grid pattern the Romans used for concrete domes.

  I can already see that architectural detail being a fun design prospect.


  For the Caldarium specifically, the current checklist for its details are so far: The ledge for the upepr floors, the windows, the exterior recesses for the windows, wall trims, wall decoration and the structures for the entrances into other parts of the bathhouse. Which might be easier to make than what I have designed so far largely on the basis the most lavishly decorated sections of such large buildings tended to be the ground floor and the ceiling. Further up on a multi-level room the decoration might be more spartan as a visitor's eyes might not focus so much on these areas.


  Although trust me to take on designing one of the iconic displays of extravagance by the Roman Emperors of the third century. Septimus Severus was the third emperor after emperor Commodus, A famously hedonistic man who saw cinema fame for his portrayal in the film Gladiator who cared more about filling his time with lavish games no matter how much it cost the city of Rome, whose death marked the beginning of Rome's slow decline as the master of the world and might have been the start of the empire turning its own interests inward and ignoring the rest of the world.

  That kind of behaviour usually precludes falling into obscurity and complaining of how you've fallen into irrelevance somehow, but it doesn't half create some beautiful buildings sometimes.

Thursday, 9 February 2017

Four: David's Desk Part One


  With some of the larger models out of the way, I had the thought that while the camera needs installing, some smaller models could be made, mainly for things I feel sure would be seen in the world. David's desk will take some focus at the very least so at least I have some assets to experiment with when setting up cameras.


  This was all after designing the finer details on David's computer terminal. To give some authenticity when in a close-up view, I took to modelling the keyboard key-by-key and arranging the UVs to correspond with their arrangement on the board.This sort of arrangement will make it easier when creating the texture maps for the keys. Once complete I designed a low-resolution "cover" that would display the keys' definition as a normal map and maybe extrapolate the textures so at a distance the solid block looks like a convincing keyboard. Drawing from how I designed Four's mouth,  an indentation was created to provide for an area for the keys to be set into, The edge can be just-about seen so it does not look like the keys are simply phasing into the surface of the computer's keyboard extension.


  The size of the computer terminal necessitated the need for for more space on the desk. Geometry was pushed forward slightly and the UV maps were re-adjusted accordingly to square out the stretching.


There might be some way to go, and before I get into science equipment like microscopes, centrifuges, test tubes etc. I have some experience with college-level genetic science, experiments included, I have some understanding already of the kind of equipment that might be practical for microbiological research (Alfonse's field of study in the story) and DNA sequencing. Although a combination of camera-work and estimates on what to focus will determine just equipment to keep, as some devices and equipment I understand might not be recognised by a general audience.

Wednesday, 8 February 2017

Four: More Biolab Furniture


  Work continues on the lab, enough that I can provide some rudimentary render/colour tests. Most elements have simple blinns and lamberts with an ambient occlusion ode, while the metal was given a basic chrome shader to make it look more properly metallic.


I felt my initial table designs were not the kind of science fiction atmosphere I was aiming for.


A first design I had was a more trestle-table look, but reflecting back this was the wrong kind of structure for the table I was aiming for so instead I looked into the design feature of metal tubing. I could either have built a frame that planted the table firmly on the ground although the desks that did this offered a gap for the seated's legs and chair.

  The alternative possibility was a more cafeteria bench, where the pipe-like legs went down and then curled up to support benches. This wasn't really practical, like the desks the seated's legs have full freedom and the pipe that supports their seats rise up to go under the seating. So I tried something inspired by the cafeteria bench.


  More UV maps, after looking at references the computer is more convincing. Though I may have to settle for a fully modeled keyboard at close-to-near-mid distance and a mock box at more distant ranges.


Tuesday, 7 February 2017

Four: Furnishing the Biolab


  With the corridor models done I've gone back to the biolab to build David's office and the corresponding articles starting with the largest furniture - the chairs and tables.


  As can be seen by the figure behind the chair, I needed a scale, which in hindsight I perhaps should have made first. It's only basic but it serves the neccesity of providing a means to brig in a more human scale for construction as this is an ultimately human environment. The biolab needed furniture that conformed to human ergonomics. For the furniture I went back to my references of 1970s designs


  So far the components I can call complete aside from UVs are a desk, an office chair, and a stool. While close to completion, the computer terminal in David's office (an attempt at designing a terminal with the elegant sleek side of the 60s while understanding that CRT screens were what people thought would always be used for monitors) needs a keyboard. Looking at my influences (the source of the CRT screen, all-in-one look and integrated keyboard area), maybe the computer is better off with more of a back to it as right now it more closely resembles a flatscreen pretending to be a CRT.


One of the elements of Four's isolation unit that I drew up in concept art was a bed that mostly resembled some kind of bean-bag. With some geometry tweaks, the moulded seats of the stools might work as a foundation for the bed's model.


Monday, 6 February 2017

Four: Corridor Semi-Completion


  The key components for the tunnels around Ceti base are ready for textures and lights. The essential elements assembled are a blast door, a tunnel, a straight intersection, and a T intersection. I might be able to build the focus corridor with these. Although creating an X-intersection will only take me an hour or two to build, it is more a question of whether such a section can be mimicked with camera-work and the T-section..


Because of the number of models involved I am thinking of creating a system where at a far enough distance, the leather panels and the pipes along the bottom are replaced with panels that mimic their look. The same would be the case for the flourescent lights in order to save complexity during renders.


  I feel I can sign these models off for now, and will come back to these for textures, normals and so on at a later date.


  The models are kept symmetrical by mirroring. I create one quarter of the section and then mirror the geometry, then I mirror the UV maps and sew contiguous sections together so that just because the geometry is mirrored does not mean what's on the surfaces has to be. This is also the case with putting UV shells on top of each other. I'm moving away from this to experiment with more varied appearances.


For easy importing and instancing, each segment has been given its own scene file under a special asset folder..

Saturday, 4 February 2017

Four: Corridor Geometry Progress


  The geometry for the corridor elements are almost complete. With this finished I can move back to designing the biolab which will be good as on Friday I had some solid feedback on how to give these different areas character.


  I worked out in a discussion with Alan that I am somewhat blending the two aesthetics of 1960s and 1970s science fiction. To put it simply, the Sixties were more rounded while the Seventies were more angular when it came to shapes.


So while I think I can find a synchronous level between the two, the idea we settled was that the corridor would be industrial. It would have that grey, gritty Seventies feel while the biolab would be something of a blend of the two, most importantly the biolab would be quite white; it is a clean space and the first impression that the viewer would get is looking though the windows in the corridor into this bright white laboratory, with the pure-white isolation units at the back.


   One of the selling differences would be light fixtures. More industrial sites tend to cage their fixings to safeguard them from the heavy duty operations. So the idea came to install these caged flourescent lights inside the corridors while the biolab would be downlit from wall-embedded set into the upper sections of walls.


  However an alternative location for these lights could be in the ceiling. Maybe they could even be on a track and hanging down.


The UV map for the corridor is fairly large, but to create space I might reduce the size of the ten panels at the top, which will allow me to increase the size of the main element of the corridor i nthe centre of the map.


Friday, 20 January 2017

Four: Juvenile Ready for Mudbox


My dissertation deadline is coming in so some priority has been switched to that. Earlier in the day however I dedicated some time to modifying the juvenile model. The aim was to make it ready for a session in mudbox to add the finer wrinkles and create an ambient occlusion map when mapping the skin. 


I left space so that once I transfer over the tongue, gums and teeth I can insert them into the map, hopefully in a way that I can save time by transferring some of the details of the adult's UV maps. The tongue and teeth, hopefully I can transfer over without a session in Mudbox remaking the layers.

Wednesday, 18 January 2017

Four: Juvenile Geometry Nearly Complete


  I neglected to upload yesterday but here is what I was working on Tuesday. I was working to refine the model, finishing some of the chubbiness of the juvenile's body and fixing the UV maps.


  Getting the 'stubbiness' of the juvenile's front fingers was a little more difficult as they are a little longer due to the extra bone in each finger compared to the toes.


  Yesterday was also used as a time to fix the mouth. This turned out to be a little more difficult that I first assumed as her more juvenile form mouth opens with a vertical mouthline. With the current head this was difficult but not as difficult as it could be as it was meant to be in a transition phase anyway. As Four gets older her mouth gets more normal-shaped.


  A modified mouth cavity however will mean the gums will need to be modified to fit the mouth. To fit the idea that these teeth are for a more childlike creature I may have to stub them or sink them into the gumline. I was partially inspired by canid mouths so the easiest solution will be a matter of researching how the tooth sets of puppies and kittens look. Or I go back to otters as they manage a certain cuteness with their teeth despite having enlarged canines like dogs do.


  As well as adjusting the gumline, some work still needs to be done on the UV maps. I've made a start with the larger areas and most are ready for receiving their mirrored versions already.

Tuesday, 29 November 2016

Four: Starting the Rig


  The UV mapping process was swifter than I initially expected, in part due to the layering I have considered. Everything is just about on there, the eyes could have their own texture map but on the other hand there is still some space on the above UV map not filled that could possibly fit the square UV map of the eye. Except for the core body and the head, the body has a line of symmetry down the middle of it which could be used to give a touch of asymmetry to some of the more easily definable areas of characterisation such as the face or the back. This reduced some of the time spent UV mapping as half of the map was created when mirrored. This was especially fortuitous for the UVs of the claws and teeth, to which there are a lot of models that could otherwise be easily repeated.


With the UVs done I moved on to creating the rig. There might be some tweaking needed but I did not want to repeat the mistake of Colo Colo when it came to 'solutions' that broke the various joint orientations. So I was more careful this time around, making sure the joints were oriented properly and each node was added using a locator.


  It might be tricky to see within the model but there are five bones in the tongue. The tongue is an extremely flexible muscle so I figured this is where the most amount of control is required to allow it to bend, flex and curl. I had been contemplating how to deform it as well, as it appears to me there's going to be a good deal of stretching (nothing extreme, Four doesn't have a snake's tongue), I looked at dog and lizard tongues for ideas on how to construct it.


  I spent some time twisting my wrists and ankles about in order to get an understanding of where the joint's centre was. From what I can estimate,the point of rotation is a little below the bone growths that define the ends of the wrist and the ankles.


  I'm still considering some reverse joints on the feet. The hands, conversely, I could install a reverse joint set maybe with the ability to turn its control over the hands on and off for those times when Four will be using her digits to grab or manipulate objects. 


  Geometry-wise I think she might be about done. Though I might or might not at some point go back to the fins to see how I could make them blend. Or better yet refer back to my influences to see how fish fins, or possibly the fleshy 'sails' on certain breeds of dinosaur attach to the body.